Order Manager
Introduction
The Order Manager emulates the following actors
- Order Placer
- Order Filler
- Automation Manager
- Label Broker
- Label Information Provider
- Image/Report Manager
- Acquisition modality
for various integration profiles related to imaging and laboratory ordering. This simulator is also able to produce DICOM worklists and to respond to SCU queries thanks to the use of the DCMTK toolkit. The aim of this application is, in a first hand, to help modality developers with querying worklists without asking the support of Order Placer and/or Order Filler systems for producing the relative orders. In another hand, the OrderManager will help developers with testing the sending and receiving of HL7 messages required by the transactions they have to support in the context of a the following integration profiles:
- Radiology domain
- Scheduled Workflow (SWF)
- Scheduled Workflow b (SWF.b)
- Mammography Workflow (MAWF)
- Import Reconciliation Workflow (IRWF)
- Eye care domain
- Advanced eye care workflow (A-EYECARE)
- Basic eye care workflow (B-EYECARE)
- Laboratory domain
- Laboratory Testing Workflow (LTW)
- Laboratory Analytical Workflow (LAW)
- Laboratory Specimen Barcode Labeling (LBL)
See below the exhaustive list of actors and transactions emulated by the application.
| Domain | Role played by the simulator | Transactions | Availability |
|---|---|---|---|
| Radiology | Order Filler | RAD-3 and RAD-2 | 1.0-RC1 |
| - | Order Placer | RAD-2 and RAD-3 | 1.0-RC1 |
| - | Order Filler | RAD-48 | not yet available |
| - | Order Placer | RAD-48 | not yet available |
| - | Order Filler | RAD-5 | 1.0-RC1 |
| - | Image Manager/Report Manager | RAD-4 and RAD-13 | 2.1-GA |
| - | Order Filler | RAD-4 and RAD-13 | 2.1-GA |
| - | Order Filler | RAD-1 and RAD-12 | 3.1-GA |
| - | Order Placer | RAD-1 and RAD-12 | 3.1-GA |
| - | Image Manager/Report Manager | RAD-12 | 3.1-GA |
| - | Acquisition Modality | RAD-5 | 3.2-GA |
| Laboratory (LTW) | Order Filler | LAB-1 and LAB-2 | 2.0-RC2 |
| - | Order Placer | LAB-1 to LAB-5 | 2.0-RC2 |
| - | Automation Manager | LAB-4 and LAB-5 | 2.0-RC6 |
| - | Order Result Tracker | LAB-3 | 2.0-RC6 |
| Laboratory (LAW) | Analyzer | LAB-27, LAB-28 and LAB-29 | 2.0-RC6 |
| - | Analyzer Manager | LAB-27, LAB-28 and LAB-29 | 2.0-RC6 |
| Laboratory (LBL) | Label Broker | LAB-61, LAB-62, and LAB-63 | 5.0.0 |
| - | Label Information Provider | LAB-61, LAB-62, and LAB-63 | 5.0.0 |
| Eye care | Order Placer | RAD-2 and RAD-3 | 3.0-GA |
| - | Order Filler | RAD-2 and RAD-3 | 3.0-GA |
| - | Order Placer | RAD-48 | not yet available |
| - | Order Filler | RAD-48 | not yet available |
| - | Order Filler | EYECARE-1 | 3.0-GA |
| - | Image Manager/Report Manager | RAD-4 and RAD-13 | 3.0-GA |
| - | Order Filler | RAD-1 and RAD-12 | 3.1-GA |
| - | Order Placer | RAD-1 and RAD-12 | 3.1-GA |
| - | Image Manager/Report Manager | RAD-12 | 3.1-GA |
How to get started
Login
First of all, note that, like the other applications from Gazelle testing platform, Order Manager is linked to our CAS service. That means that, if you have an account created in Gazelle, you can use it, if you do not have one, you can create one now by filling the form at /EU-CAT/users/user/register.seam . The login link (“CAS login”) is located in the top right corner of the page.
Being logged in the application will give you access to some additional features. As an example, each time you create a new object in the application (patient, order, worklist …), if you are logged in, you will be set as its “creator”, which will enables you to easily retrieve your items. If the system you are testing has to receive messages from the Order Manager, the system you have selected will be stored into your preferences and the application will offer you this one in first position, the next time you launch a test.
Registration of Systems Under Test acting as responders
If your system acts as an HL7v2 or DICOM responder in one of the transactions offered by the simulator (eg.your system is an Order Placer and supports RAD-3 transaction) you will have to enter its configuration in the application.
In order to proceed, go to “SUT Configurations > HL7v2 responders” or “SUT Configuration > DICOM SCP” and hit the “Create a Configuration” button. You can also copy  or Edit
  an existing configuration.
The simulator needs to know:
- A name for your configuration (displayed in the drop-down list menus)
- The list of transactions supported by your system
- The IP address
- The port the system is listening on
- The receiving facility/application (HL7v2)
- The charset expected by your SUT (HL7v2)
- The AE Title (DICOM)
If you are logged in when creating the configuration, you will be set as the owner of the configuration. If you do not want other testers to send messages to your SUT you can uncheck the box “Do you want this configuration to be public?” and you will be the only one to be able to select your system in the drop-down list and to edit it (if logged in !).
Before sending messages to your system under test, ensure that your firewall options give to Order Manager the access to your system.
HL7 messages validation
The simulator communicates with Gazelle HL7 Validator. For each received and sent messages, you can ask the simulator to validate the messages. Below is the meaning of the different icons you can meet in the Test Report section of each page or under the HL7v2 messages menu (gathers all the messages received and sent by the simulator).
| Icon | Meaning |
|---|---|
 |
Opens the pop-up containing the received and sent messages beside their validation results. The validation service is automatically called each time you hit this button. Consequently, the validation result you see is always the one matching the newest version of the message profile. |
 |
The message has not been validated yet. Hitting this button leads to the same action as the previous icon (magnifying glass). |
 |
The message has been successfully validated. |
 |
The message has been validated and the validator reports errors. |
 |
Opens a pop-up asking you to which system under test you want to send this message again. The simulator is able to replay a message it has already sent. The messages which have been received by the simulator (as responder) cannot be send a second time. |
Starting a test
The menu part located at the top of the application offers access to the three IHE domains in which the Order Manager can be involved for testing. In each domain’s sub-menu, the list of simulated actors is given. For each actor, a menu entry also leads to the page summarizing the network configuration of the tool.
SUT configurations is the starting point for users who test an HL7 responder or DICOM SCP, it leads to the pages for system configurations
Messages leads to the pages gathering all the HL7 or DICOM messages sent and received by the simulator.
Below are some tips to easily access the right page of the tool depending on what you want to do.
Tips for first comers
Send and receive queries for AWOS
If you want to test your Analyzer Manager, select Laboratory > Analyzer > [LAB-27]Query Analyzer Manager for AWOS to send messages (defined by LAB-27 transaction) to your system under test
If you want to test your Analyzer, select Laboratory > Analyzer Manager > Configuration : this page shows the configuration of the Analyzer Manager actor to which your Analyzer can send messages in the context of a LAB-27 transaction.
Create, cancel, replace … an order
If you want to test your Order Filler, select the Radiology > Order placer submenu. This sub menu will offer you 2 choices
-
[RAD-2] Create/Cancel order: use this page to send the messages specified by the Placer Order Management transaction (RAD-2) to your Order Filler
-
Configuration : this page shows the configuration of the Order Placer to which your Order Filler can send messages in the context of a RAD-3 transaction.
If you want to test your Order Placer, select the Radiology/Order filler submenu. This sub menu will offer you 2 choices
-
[RAD-3] Create/Update/Cancel order: use this page to send the messages specified by the Filler Order Management transaction (RAD-3) to your Order Placer
-
Configuration : this page shows the configuration of the Order Filler to which your Order Placer can send messages in the context of a RAD-3 transaction.
If you want to test your Laboratory Order Placer, select the Laboratory > Order Filler submenu. This sub menu will offer 3 sets of transactions, only two of them are of your interest:
-
[LAB-1/LAB-2] Notify Order Placer of orders: use this page to send messages (from LAB-1 and LAB-2 transactions) to your system under test
-
Configuration: this page shows the configuration of the Order Filler to which your Order Placer can send messages in the context of a LAB-1 transaction.
Create a worklist and query the DICOM SCP
The part of the simulator acting as an Order Filler is also able to create DICOM worklists, the latter can be queried by your modalities in the context of RAD-5 transaction for instance. A proxy is running and listening to your C-FIND queries, the ones are forwarded to the DICOM Basic Worklist Management SCP (wlmscpfs) from the DICOM toolkit developed by OFFIS, DCMTK. Before being forwarded, the messages are stored in database and the received responses are also stored before being forwarded to your system. In this way you can look at the exchange messages. The log file produces by the DICOM Worklist is parsed and stored in the database of the tool, in that way you can consult more details about the DICOM association performed with our tool.
Codes used in this tool
(1) The mapping between ordering codes in the following table and the procedure codes in Radiology is based on the file available at https://gazelle.ihe.net/common/order-manager/orderHierarchy4Radiology.xml
(2) The list of codes used by the Order Manager tool is directly available in the tool from the Value Sets menu.
Sharing of data with Test Management and PatientManager Gazelle applications
Some actors need to be aware of the patient’s demographics and encounters. In the radiology domain, this functionality is assumed by the ADT actor with the RAD-1 and RAD-12 transactions. In other domains, the use of PAM (Patient Admission Management) integration profile is recommended and often required. In order to populate the Order Manager with consistent data, we have chosen to put in place a mechanism for sharing patients and encounters data between several applications from the Gazelle testbed. In case you just need a patient and an encounter but you did not use PAM Simulator or Test Management applications to create it, you can randomly generate one.
Random generation of patient and encounter
For the needs of the OrderManager, a REST web service has been implemented in Patient Manager application which enables the other applications to get random data for a patient and/or an encounter. As a consequence, if you want to create an order for a new patient or for a new encounter (you already have the patient created in OrderManager) you only have to select the country in the application (or the existing patient), the Patient Manager tool will return you a patient and a related encounter or only an encounter.
The example below is taken from the page which enables a user to send a new order to his/her Order Filler.
Hit the button entitled “Create new patient and encounter” if none of the offered encounters nor patients meet your needs.
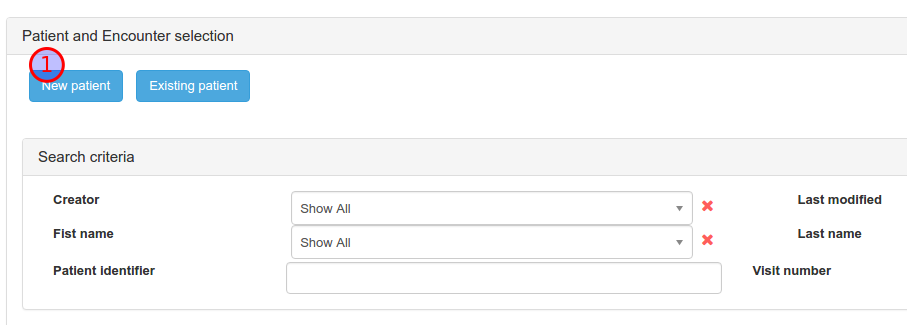
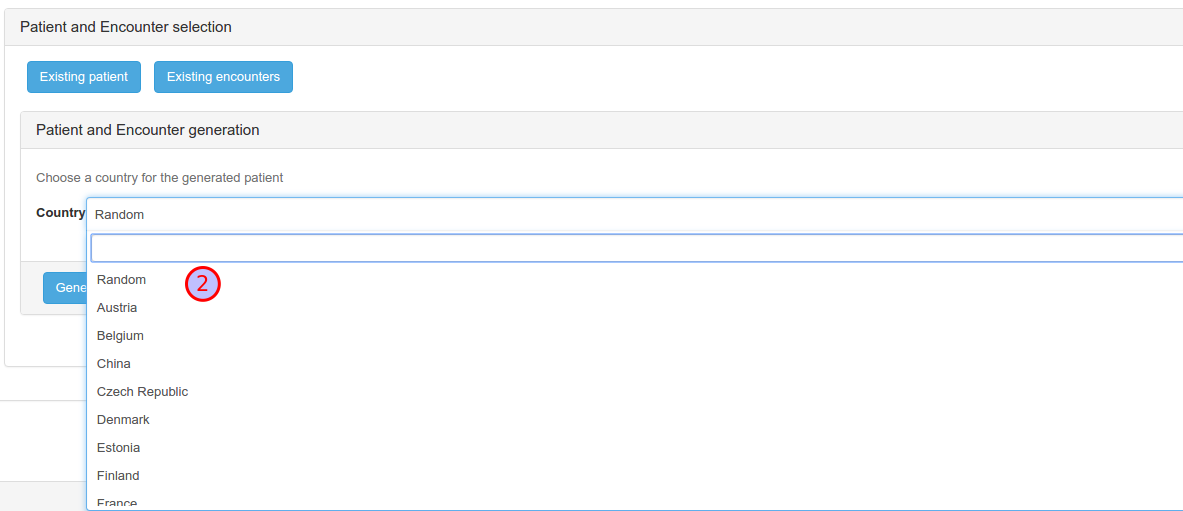
You will then have to choose the country of your patient. Here we have chosen India.
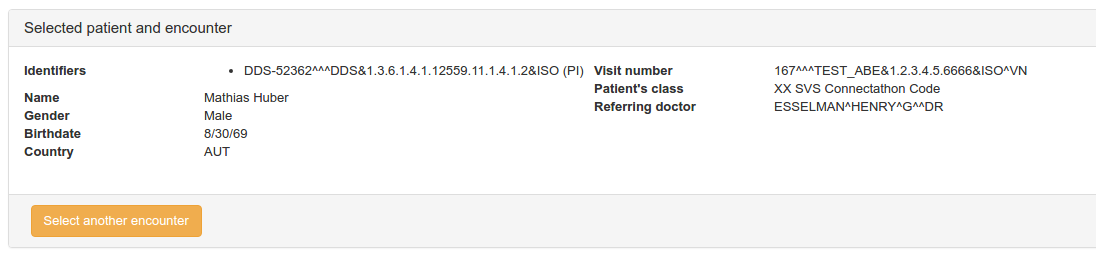
Finally, the patient and the encounter have been created
If you want to use a patient already registered in the application, use the “New encounter” button, you will be asked to pick up one of the existing patient and an encounter will be automatically generated with random values.
Import patient from Patient Manager and Test Management tools
Both Patient Manager and Test Management applications enable the user to create patients based on various criteria. In some tests, you will want to reuse the same patient without wasting your time copying each piece of information one by one. In order to save your time during the connectathon or during your testing periods, we have added a feature in those applications. You will only have to select the patient you need, hit a button, choose the patient identifier to use for creating the order or the worklist and send the request to the OrderManager.
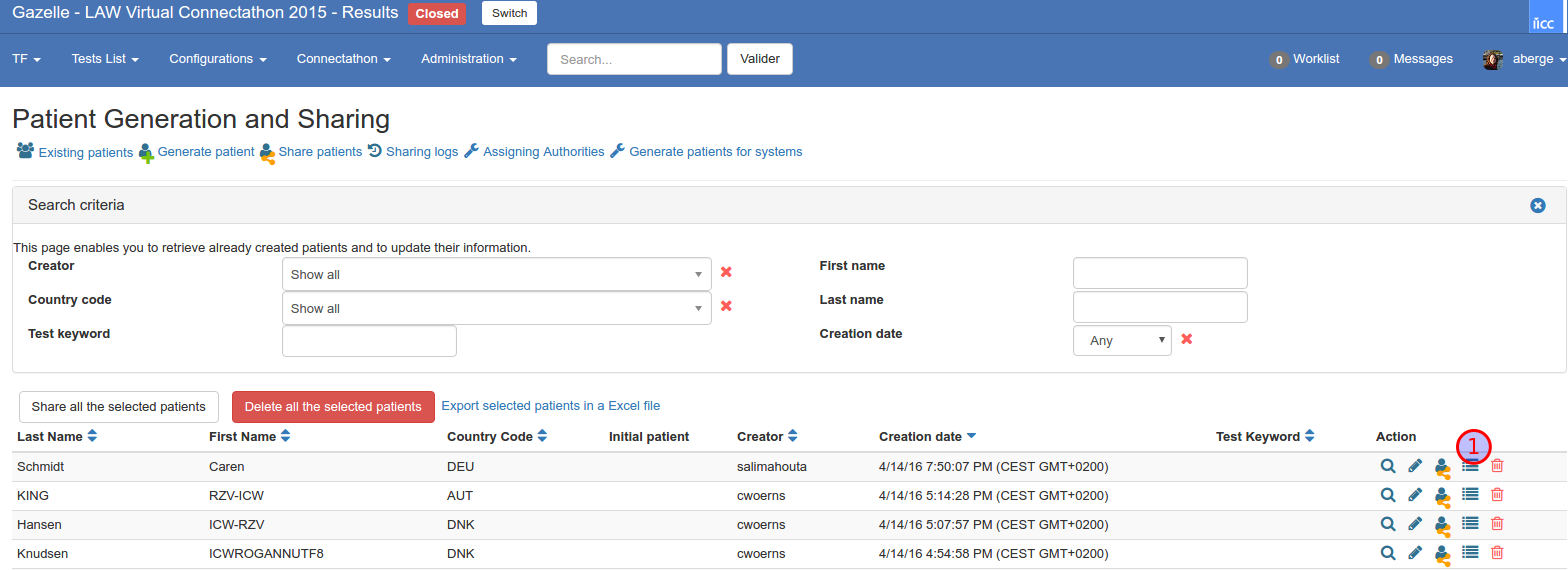
In Patient Manager, the button is available for each patient in the All Patients page. In Test Management, go to Connectathon –> Connectathon –> Patient Generation and Sharing –> tab “Existing patients”.
The screenshots below are taken from Test Management.
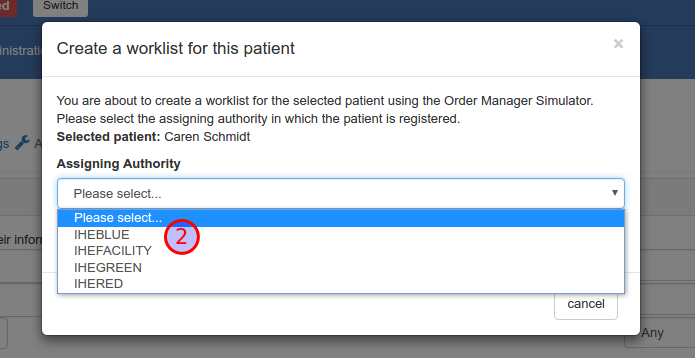
Select the patient to import in Order Manager. Hit the “Create a worklist for this patient” button; the last button of the row, on the right.
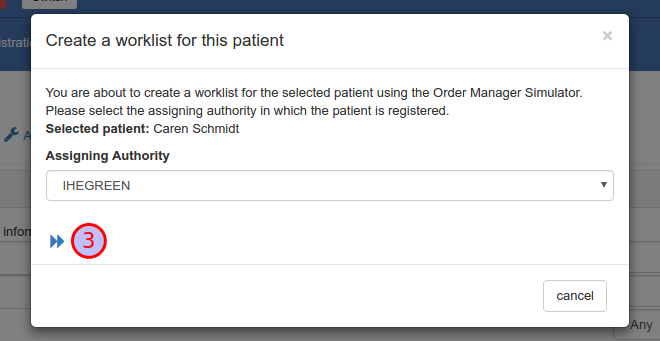
A pop-up shows up and ask you from which assigning authority you want to use the patient identifier. Select the proper assigning authority and hit the blue button.
You will then be redirected to Order Manager, the patient demographics are filled and an encounter has been created randomly.
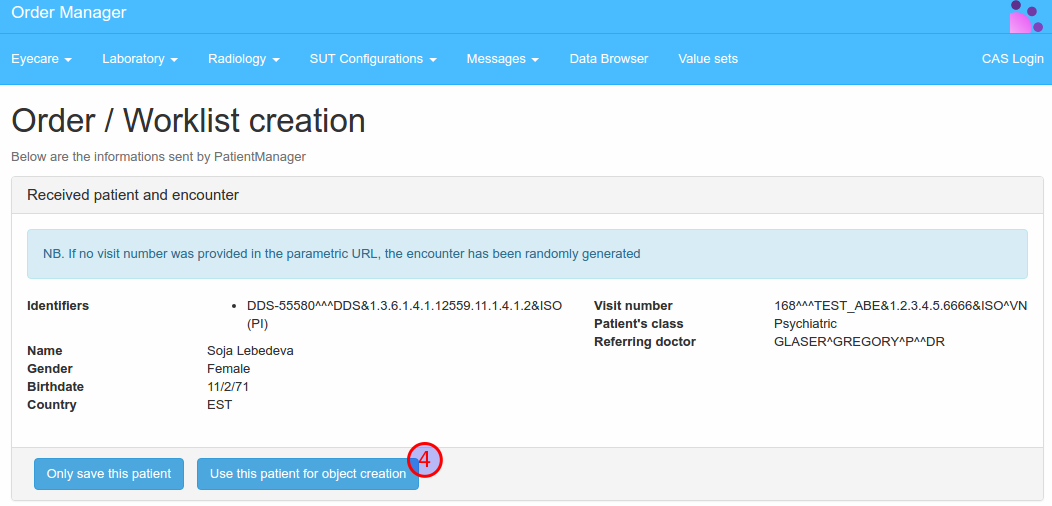
Then, choose whether you want to save the patient to use it later or to create an order or a worklist right now. You then need to tell the application for which domain (5), actor (7) and which kind to object (6) you want to create for this patient.
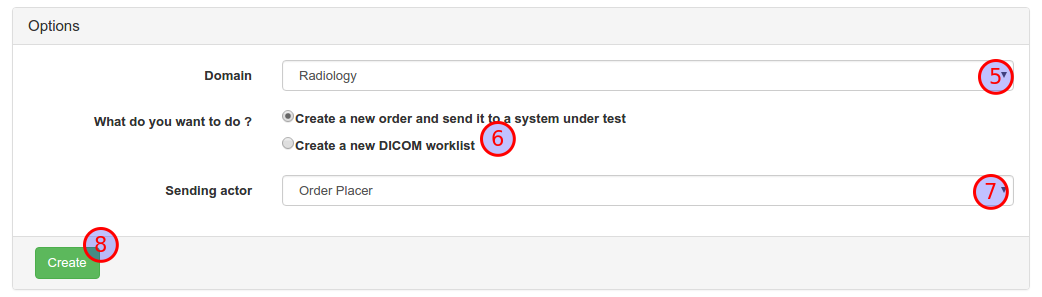
Finally, hit the “create” button.
Note that, if you choose to create a worklist, the order will be filled with random values.
Import encounter from Patient Manager
If you have created an encounter in the Patient Manager application, you may want to use it to create an order or an encounter. In this case, choose the encounter you want to import into OrderManager; go to its permanent page and hit the button “Create a worklist or an order for the selected encounter”. You will also be asked to select the patient’s identifier; then you will reach the page described for step 4.
Radiology and Eye Care orders
The order management part for radiology is divided into two parts: placer order and filler order. The placer order part gathers the actions related to the Placer Order Management transaction (RAD-2) whereas the filler order part is dedicated to the Filler Order Management transaction (RAD-3).
The orders can be created either by the Order Placer (RAD-2) or by the Order Filler (RAD-3). In both cases, each system attributes an order number to the just created order. In the RAD-3 transaction case, initiated by the Order Filler, the Order Placer has to notify the Order Filler of the number it has attributed to the order contain in the message sent by the Order Filler.
SWF.b
From version 4.0.0, the Order Manager tool supports the SWF.b profile. It will be able to handle and validate the OMG and OMI messages your SUT sends to it. You can also ask the tool to use HL7v2.5.1 instead of HL7v2.3.1 when configuring the message to send to your SUT, to do so, tick the “Send HL7v2.5.1 messages ?” checkbox.

Placer Order management (RAD-2)
The placer order management transaction is initiated by the Order Placer, the one sends a message of type ORM\^O01\^ORM_O01 (or OMG\^O19\^OMG_O19) to the Order Filler. Three actions can be performed, for each one, the order control code contained in the message (ORC-1) differs.
To test your Order Filler
You reach this page from menu Radiology > Order Placer > [RAD-2] Create/Cancel orders.
Create a new order (order control code = NW)
Firstly, select the configuration of your system under test; the simulator needs it to send the message. Then select “Create a new order” choice. The list of encounters stored in the simulator is displayed, you just have to select the one you want (click on the medkit icon).
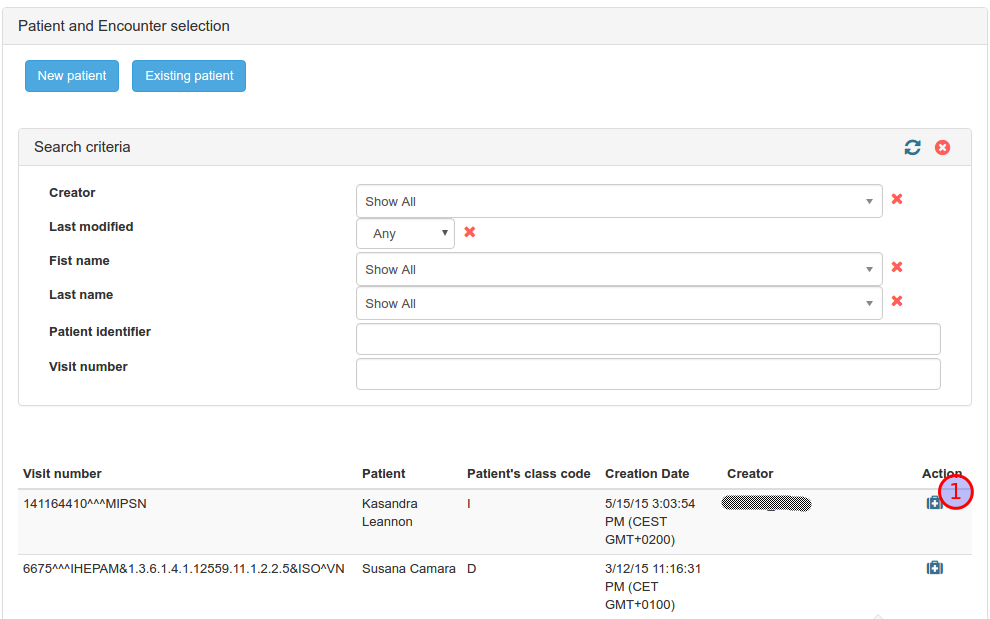
The demographics of the patient related to the selected encounter and the details about the encounter are displayed.
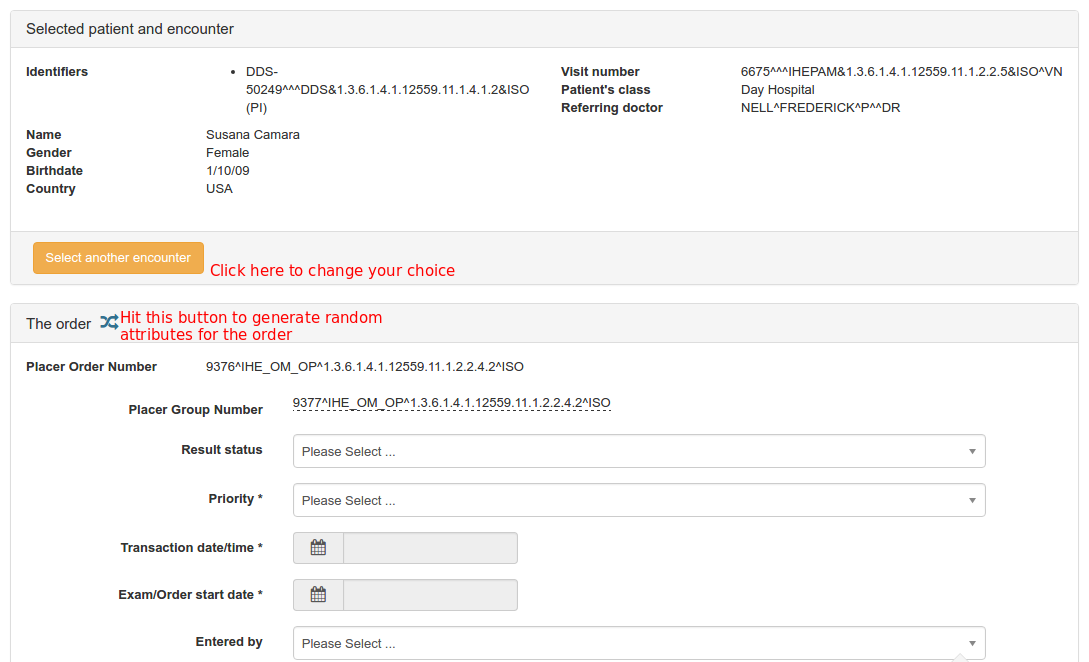
Below, you can see a panel entitled “The order”. Here are the values required by the simulator to create the message. To save time, you can fill only some (or none) of them and hit the “Random” button. Random values will be taken from the SVS repository. When you are ready, click on “send message” button. Finally, the table gathering the message sent by the simulator and the one received from your system is displayed. You can used the validation buttons to check the conformance of the messages to the IHE specifications.
Hit the “Perform another test” button to continue testing.
Cancel an existing order (order control code = CA)
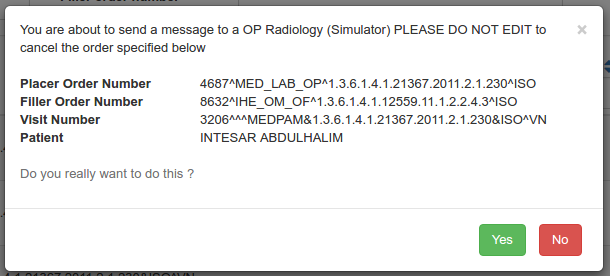
Select the action to perform as “Cancel an existing order”. You will be provided with the list of orders owned by the Order Placer part of the simulator.
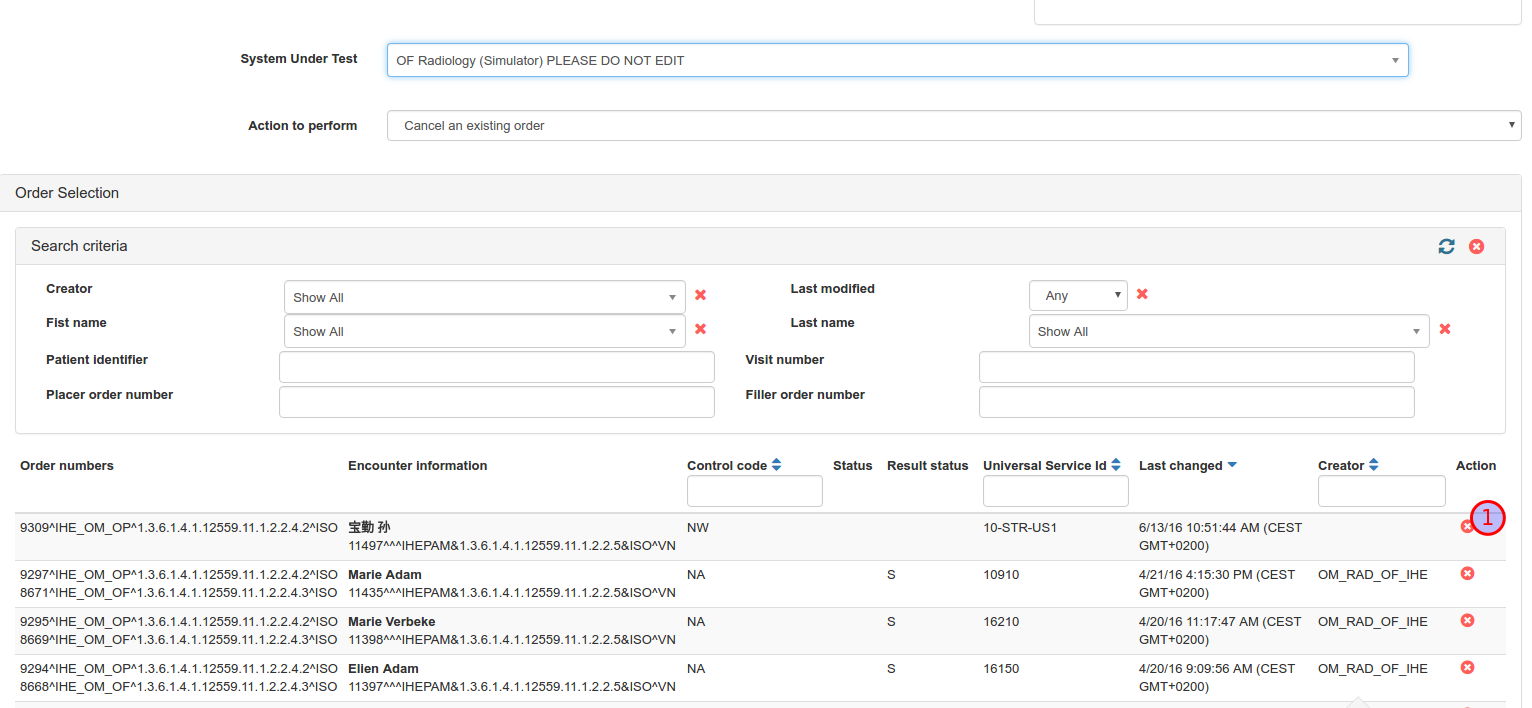
Select the one you want to cancel (click on the red circle), a pop-up shows up which ask you to confirm your choice.

If you click “Yes”, the message is automatically sent to your Order Filler. If you click “No”, the pop-up is closed and nothing else is done.
Stop the fullfilment of an “in progress” order (order control code = DC)
The order control code DC is sent when an order is already started. The action to perform are the same as the one for cancelling an order.
To test your Order Placer
Read carefully the configuration of our Order Filler. To do so, go to Radiology > Order Filler > Configuration. The Order Filler will store all the messages it receives and integrates them. That means that it will create/cancel/discontinue the orders. Be carefull to always send the same placer/filler order number for a given order. The orders received from your simulator are stored in the database and you can browse them from menu Data Browser. The name of the creator is “{sending application}_{sending facility}”.
Filler Order management (RAD-3)
The placer order management transaction is initiated by the Order Filler, the one sends a message of type ORM\^O01\^ORM_O01 (or OMG\^O19\^OMG_O19) to the Order Placer. Three actions can be performed, for each one, the order control code contained in the message (ORC-1) differs.
To test your Order Placer
You reach this page from menu Radiology > Order Filler > [RAD-3] Create/Update/Cancel orders.
Create a new order (order control code = SN) The workflow is the same as the one for RAD-2 transaction. Refer to the previous section for details.
Cancel an existing order (order control code = OC)
The workflow is the same as the one for RAD-2 transaction. Refer to the previous section for details.
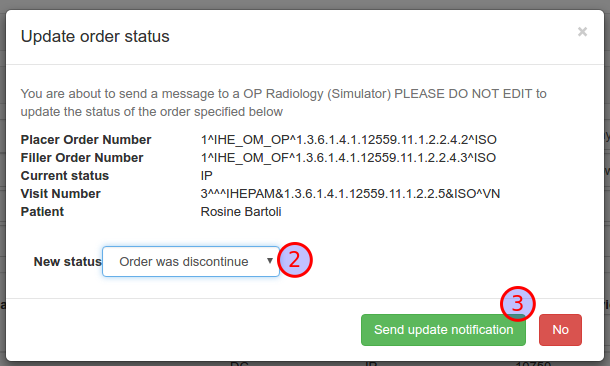
Update the status of an order (order control code = SC)
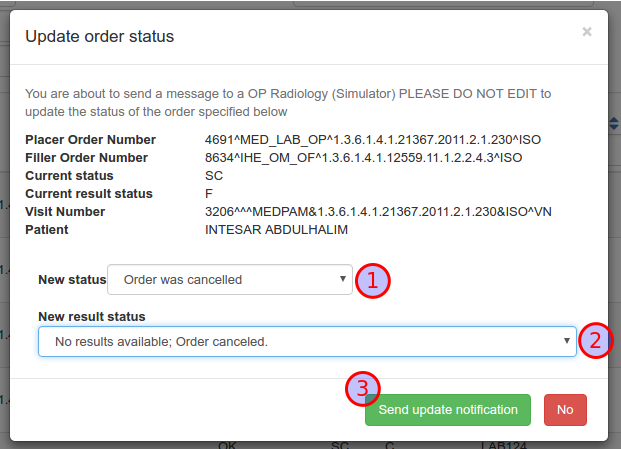
Select the action to perform as “Update order status”.
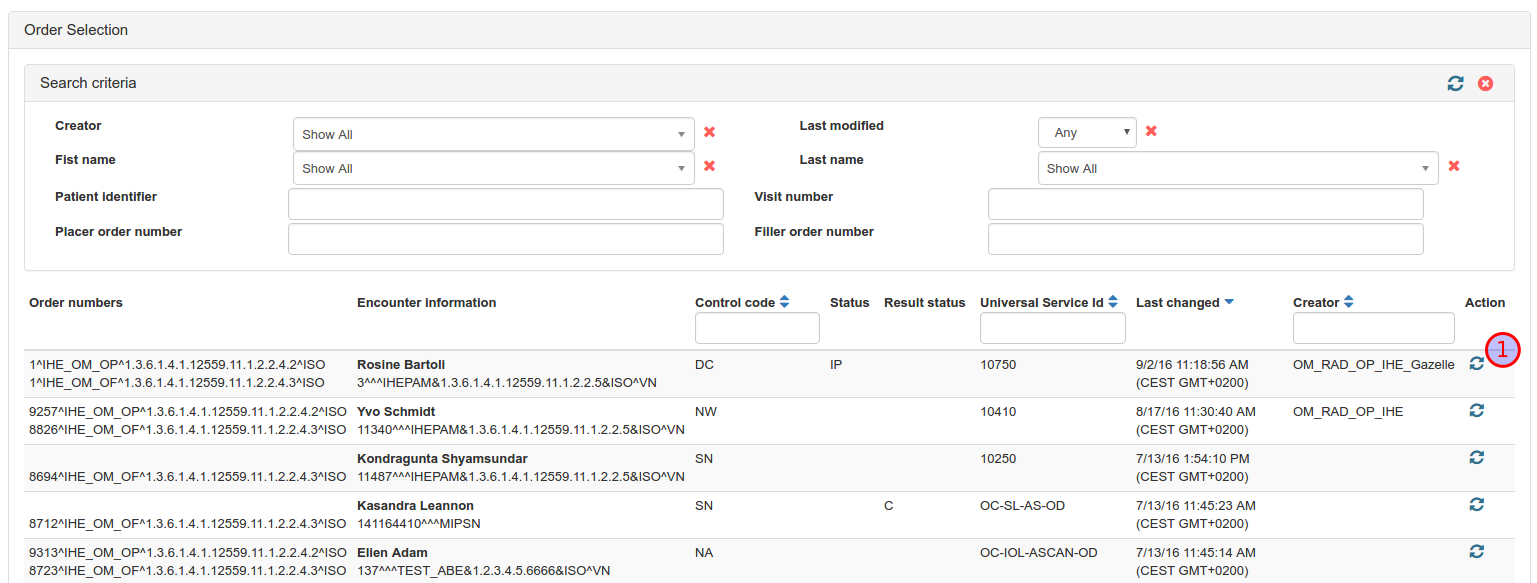
You will be provided with the lists of orders owned by the Order Filler part of the simulator. Select the order you want to update (click on the refresh icon), a pop-up shows up which ask you to select the new status of the order. Click on the “Send update notification”, the message will be automatically sent to your system under test.
Test your Order Filler
Read carefully the configuration of our Order Placer. To do so, go to Radiology > Order Placer > Configuration. The Order Placer will store all the messages it receives and integrates them. It means that it will create/cancel/update the sent order. Be carefull to always send the same placer/filler order number for a given order. The orders received from your simulator are stored in the database and you can browse them from menu Data Browser. The name of the creator is “{sending application}_{sending facility}”.
Procedure management
The Order Manager tool is able to act in transactions RAD-4 (procedure scheduled) and RAD-13 (procedure update) as both Order Filler and Image Manager (or Report Manager).
Radiology > Order Filler > [RAD-4/RAD-13] Scheduled/Update procedures*: Send procedures to your Image/Report Manager using our Order Filler
- Radiology > Image Manager > Configuration gives you the connection information to send messages to our Image Manager.
SWF.b
From version 4.0.0, the Order Manager tool supports the SWF.b profile. It will be able to handle and validate the OMG messages your SUT sent to it. You can also ask the tool to use HL7v2.5.1 instead of HL7v2.3.1 when configuring the message to send to your SUT, to do so, tick the “Send HL7v2.5.1 messages ?” checkbox.
Order Filler sends procedure notifications
The application offers you two ways of creating procedures:
- Schedule a procedure for an order already created within the Order Filler. This can be useful if you want to test a workflow and the Order Filler actor is missing and thus replaced by the tool
- Schedule a procedure for an order you create from scratch. This feature may be useful if you only need to test the behaviour of your Image Manager.
In both cases, the procedure information are retrieved from an XML file which is used to map the ordering codes with the procedure informations. By now, we create only one requested procedure per order. If when reading those files you notice that an ordering code and/or procedure code your system supports is not available, please provide us with those informations and we will append them in our configuration files.
The list of ordering codes is available from the Value Sets page. Look for the value set named “Ordering Codes - Universal Service ID (RAD)”. Procedure mapping file is available at https://gazelle.ihe.net/common/order-manager/orderHierarchy4Radiology.xml
Test your Image Manager
The first time you use the application to send a message to your Image Manager, you must register your system under test into the application, that means, providing the application with your connection informations: IP address, port, receiving application/facility. To do so, go to the SUT Configurations > HL7v2 responders menu and click on the “Create a configuration” button.
Procedure scheduled
Go to Radiology > Order Filler > [RAD-4/RAD-13] Procedure Scheduled/Update and follow the instructions below.
- Select your system under test in the drop-down list and verify the connection information. Also check on your system under test that no firewall rules prevent Gazelle servers from accessing your system.
- Select “Procedure scheduled” as action to perform. The list of available orders should be displayed
- You can restrain the search by using both the filters on columns and the research fields above the table. When you have found the order you want to use, click on the calendar icon.
- The Requested Procedure is then created by the application and you only have to set the Scheduled Procedure step start date/time and eventually the modality type (if not specified in the mapping file)
- Finally click on “Send message” and wait for the application to receive the acknowledgement from your system. As a last step, you can validate the conformance of the acknowledgement your system has sent against our HL7 message profile.


Procedure Update
There are 4 actions that the Order Filler and the Image Manager must be able to support. Those actions are gathered in the “Action to perfom” list.
- Procedure Update: cancel order request
- Procedure Update: discontinue order request
- Procedure Update: change order request
- Procedure Update: order has been completed
For the two first ones, you only have to select a procedure and to hit the “Yes” button when the pop-up raises. For the two last ones, you will be asked to update the start date/time and then you can press the “Send message” button. Note that once a procedure is cancelled, discontinued or said as completed, it does not show up again in the list of available procedures.
Test your Order Filler
The Image Manager actor acts as responder in the transactions RAD-4 and RAD-13. As a consequence, you will have to feed your system under test with the connection information of this part of the tool. As mentionned earlier in this page, you must be logged in to access those information.
Go to Radiology > Image Manager > Configuration
Once your system is configured to communicate with the tool, you can send ORM\^O01\^ORM_O01 (or OMI\^O23\^OML_O23) messages as defined for transactions RAD-4 and RAD-13. Note that, the Image Manager implemented in the Order Manager only plays a role of a message recipient. New procedure will be created, updated, cancelled… according to the message content but no other actions will be taken by this part of the tool.
If you want to see how the messages you have sent have been integrated by the tool, go to the section Data Browser
DICOM Modality Worklist
The Order Manager enables the user to create a DICOM worklist for a scheduled procedure step. The tool also plays the role of an Order Filler (DICOM SCU) in the context of the [RAD-5] Query Modality Worklist transaction.
Create a DICOM Worklist
Go to Radiology > Order Filler > Create a DICOM worklist
Basically, worklists are created from the scheduled procedure steps (not cancelled nor complete) which are owned by the Order Filler part of the tool. Nevertheless, you may want to create a worklist for an order for which no procedure exists yet or create a new order from scratch.
Use an existing order : Click on the “Schedule an order”. Select one of the orders displayed in the table (click on the calendar icon).

Create a new order for an existing encounter: After reaching the page to schedule a new order, click on the “Create a new order for an existing encounter” link. The list of encounters known by the application will be displayed, pick one. Then, you are asked to fill the newly created order.
Following two steps are identical in both cases:
-
Once the order is selected and filled, the procedure is created, set the start/date time of the procedure. Hit the “save requested procedure” button.
-
For each step of the procedure, a button “Create a worklis for this step” is displayed, choose one and hit the button.
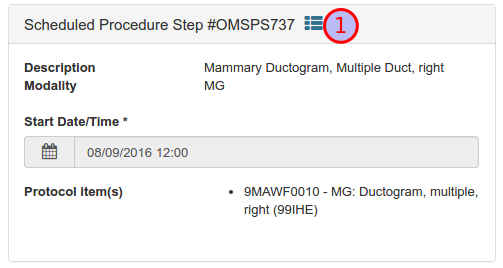
Use a scheduled procedure step: This is the default option when you arrive on the Create a DICOM worklist page. This the list icon.

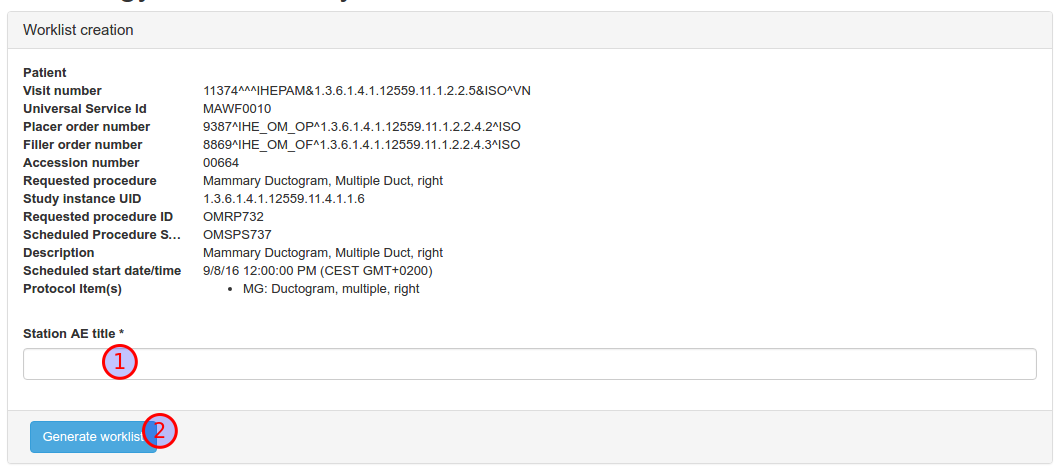
Common to all three selection modes: Fill out the Station AE Title and hit the button “create the worklist”.
The worklist is created and you can download the result of the generation.
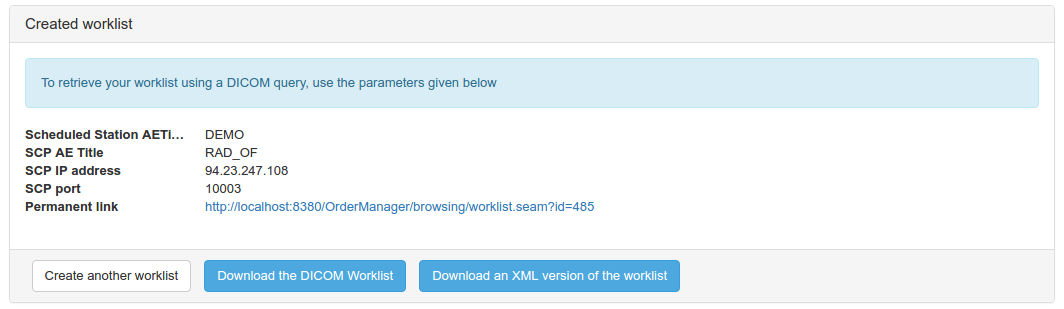
An XML file and the DICOM object are available for download. Conversion from XML to DICOM is performed using the xml2dcm tool from the DICOM toolkit “DCMTK” developed by OFFIS.
View all DICOM Worklist entries
From the Data Browser, you can access all the worklists which are available at the Order Filler. For each worklist, you will retrieve the link to download the DICOM object and the associated XML file.
Worklist query messages
We have put in place a Gazelle proxy as a front-end of our DICOM SCP. The latter is played by the DICOM Basic worklist management SCP (wlmscpfs) developed by OFFIS and available in the DCMTK toolkit.
The DICOM messages intercepted by the OrderManager are all available under menu Messages > DICOM messages.
DICOM Modality Worklist Query
The Order Manager emulates the Acquisition Modality actor in the context of the [RAD-5] Query Modality Worklist transaction. You can thus test your Order Filler as DICOM SCU for the “Modality Worklist information Model - Find” SOP class.
Register your SUT as a DICOM SCP
Read these instructions to register your product in Order Manager.
The AE Title sent by the tool is Gazelle_OM. If your SUT accepts only some AE titles, do not forget to add this one.
Configure the message
Go to Radiology > Acquisition Modality > [RAD-5] Modality Worklist Query.
Select the configuration of your system under test (1).
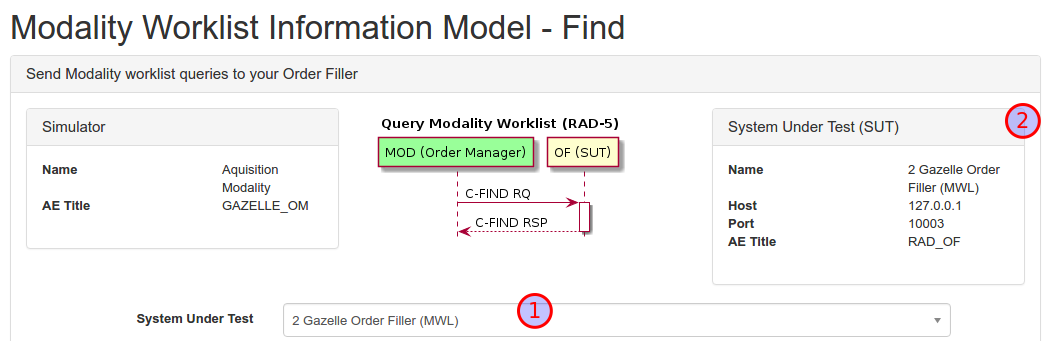
Connection information will be displayed on the right hand of the sequence diagram, check they are still up-to-date (2).
Then, the page is divided into two parts, on the left hand you have a tree representation of the C-FIND message being sent and on the right hand you have a panel to append additional tags to the query.
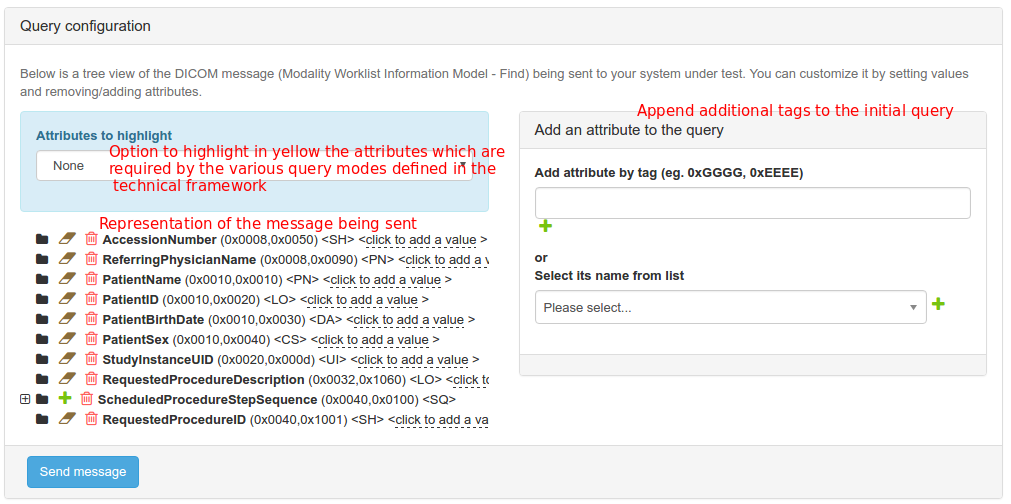
Tree representation and value setting
Each leaf of the tree represents a DICOM attribute: name tag <VR> <value>
To set or modify a value of a leaf, just click on the value to make the field editable. Then press ENTER key. If you want to remove a value, either edit the tag and delete its content, either click on the eraser icon.
Each branch of the tree represents a DICOM sequence attribute : name tag <VR>
Appending attributes
To append an attribute to the root of the query, use the panel located on the right hand of the page;
- either enter the tag (use hexa format, eg. 0x0101,0x1010) and hit the plus icon
- either select its name in the drop-down menu and hit the plus icon.
The list contains the attributes which can be found in a worklist. If one of the attribute is missing, add it using its tag. Note that you will not be able to add proprietary tags.
To append an attribute to a sequence, click on the plus icon on the left of the sequence name. Then process as described just above.
To value a newly added attribute, proceed as described in the previous section.
Removing tags
Each attribute/sequence attribute can be removed from the tree, click on the trash icon.
Attributes to highlight
The technical framework defines two sets of matching key attributes to be supported by the acquisition modality and/or importer actors. You can choose to highlight those attributes in the tree. Three options are available:
- None: nothing is highlighted
- Keys for Query by Patient: the attributes listed in table 4.5-1 of the technical framework will be highlighted. There are the matching keys to be supported when querying a worklist for a particular patient.
- Keys for Broad Worklist Query: the attributes listed in table 4.5-2 of the technical framework will be highlighted. There are the matching keys to be supported when performing a query for a broad worklist.
Send message
Once the query is ready to be sent to your system, hit the “Send message” button.
View exchanged messages
A proxy catches all the messages sent and received by the tool. When the execution of the query is complete, the list of messages exchanged between your system under test and the Gazelle tool will be available.
Laboratory orders
All the actors playing a role in the LTW, LBL, and LAW integration profiles from the Pathology and Laboratory Medicine domain are available under the Laboratory menu.
Order Placer
Under the Laboratory > Order Placer menu, you will find two sub menus:
[LAB-1/LAB-2] Notify Order Filler of orders: this page is dedicated to the sending part of the Order Placer actor from LTW profile. You will be able to create/cancel an order and to send a message to your SUT acting as an Order Filler.
Configuration: this page is dedicated to the receiving part of the Order Placer. You will find the IP address, port and receiving application/facility names of this part of the simulator.
Order Filler
Under the Order Filler menu, two sub menus deal with the management of orders:
[LAB-1/LAB-2] Notify order placer of orders: this page is dedicated to the sending part of the Order Filler actor from the LTW profile. You will be able to create/cancel update the status of an order and send a message to your SUT acting as an Order Placer.
Configuration: this page is dedicated to the receiving part of the Order Filler. You will find the IP address, port and receiving application/facility names of this part of the simulator.
Creation of a new order
Both Order Filler and Order Placer parts of this simulator work in the same way; only some little differences can be noticed due to differences between those two actors as described in the Technical Framework.

- First of all, select your system under test from the drop-down list entitled “System Under Test”.
- Then select the action to perform: Create a new order
- As defined in the Technical Framework, LAB-1 and LAB-2 transactions allows the Order Filler and Order Placer actors to exchange orders using different structures. In this part of the simulator, we allow you to test all of them. Differences between structures implies that the way to build an order in not the same depending on the message you want to send. As a consequence, before creating an order, you will have to tell the simulator which structure you want to use (see below).
- Then select an encounter from the displayed list. “New patient” button opens the patient generation box; “New encounter” displays the list of patients and you can generate a new enconter.
Laboratory order message (OML\^O21\^OML_O21) {#o21}
This message structure is battery-centric. To build such an order, follow the steps below:
- Fill out the order properties (use the “Fill with random values” button for a random filling of the form).
- Once you think the order is properly defined, click on “Create a specimen for order” button.
- A new form appears, fill it out with specimen properties. “Fill with random values” button can help you for this step.
- Click on “Add to current order” to add the specimen to the order you have previously created.
- If you need more than one specimen, click on “Add a specimen to this order” button and repeat steps 3 to 5.
- Once all the specimens are created, click on “Send message” button.

Note that you can remove a specimen from the list using the trash icon located on each row of the table.
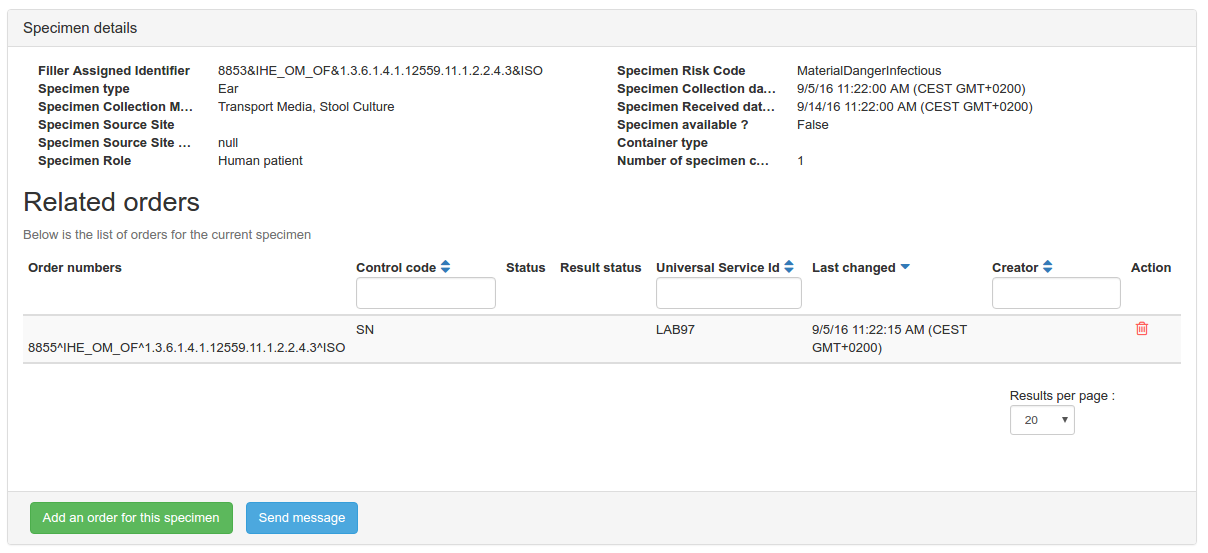
Laboratory order for multiple orders related to a single specimen (OML\^O33\^OML_O33)
This message structure is specimen-centric. To build such an order, follow the steps below:
- Fill out the specimen properties (use the “Fill with random values” button for a random filling of the form).
- Once you think the specimen is properly defined, click on “Create an order for specimen” button.
- A new form appears, fill it out with order properties, in the same way as previously the “Fill with random values” button can help you for this task.
- Click on “Add to current specimen” button to add the order to the specimen you have previously created.
- If you need more than one order, click on “Add an order to this specimen” button and repeat steps 3 to 5.
- Once all the orders are created, click on “Send message” button.
Note that you can remove an order from the list using the trash icon located on each row of the table.
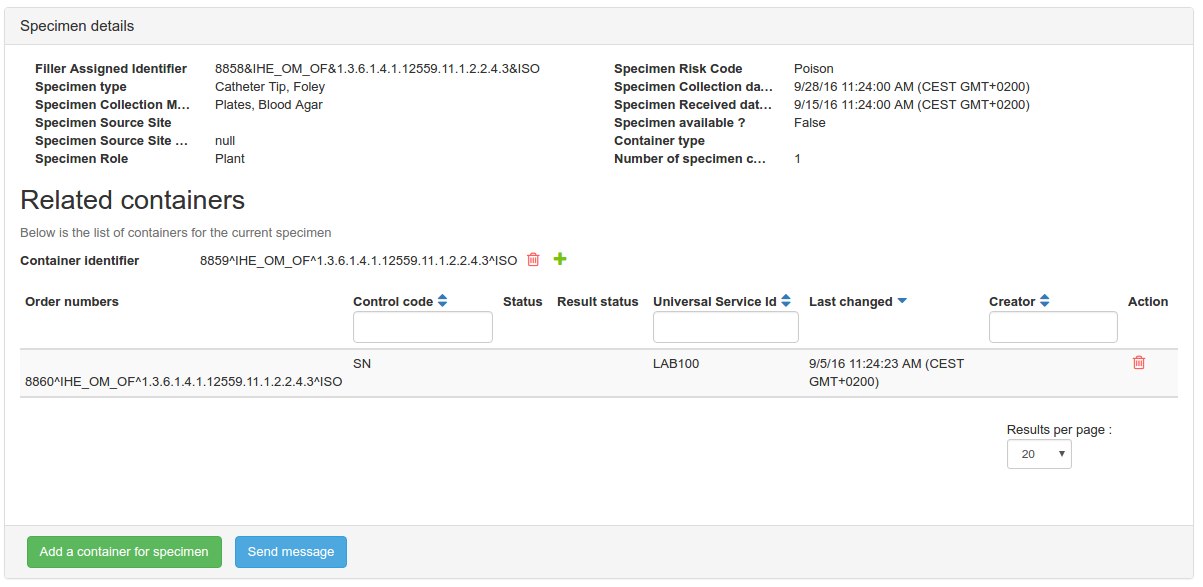
Laboratory order for multiple orders related to a single container of a specimen (OML\^O35\^OML_O35)
This message structure is specimen-centric. For each specimen, a list of containers is given and for each container, a list of orders is specified. To build such an order, follow the steps below:
- Fill out the specimen properties (use the “Fill with random values” button for a random filling of the form).
- Once you think the specimen is properly defined, click on “Create a container for specimen” button. The list of containers specified for the current specimen is displayed.
- To add an order for a given specimen click on the plus icon.
- Fill out the order properties and click on the “Add to current container” button. The order will be displayed within a table below the relative container.
- Repeat steps 3 and 4 until you have created all the orders you want.
- If you need to add another container to the specimen, click on “Add a container for specimen” button.
- To add orders to this new container, repeat steps 3 and 4.
- Finally, click on the “Send message” button.
Note that you can remove an order from a container or a container from a specimen by using the trash icon.
Cancellation of an order
Both Order Filler and Order Placer actors can cancel existing orders. See below the instructions to send such a message to your SUT.
- Select your system under test from the drop-down list entitled “System Under Test”.
- Then select the action to perform: Cancel an existing order
- Select the structure of message to use
- Select the order to cancel. A pop-up raises, click on “Yes” to send the cancellation message.
Update of an order
Only the Order Filler has the capabilities to update the status of an order. See below the instructions to send such a message to your Order Placer.
- Select your system under test from the drop-down list entitled “System Under Test”.
- Then select the action to perform: Update order status.
- Select the structure of message to use
- Select the order to update. A pop-up raises, select the new status and the new result status for the order and click on “Send update notification” button.
Sending messages to the simulator from your SUT
As mentionned above, the simulator is able to act as an Order Filler and an Order Placer (receiving role) for LAB-1 and LAB-2 transactions. The messages supported by the simulator are the same as the ones it is able to send, all the three defined structures will be understood by the simulator. To browse the orders received by the simulator, go to the Data Browser menu.
-
All orders (battery-centric) for the orders sent and received within OML\^O21\^OML_O21 messages
-
All orders (specimen-centric) for the orders received and sent within OML\^O33\^OML_O33 and OML\^O35\^OML_O35 messages. In that page, you will first see the specimen, and then, for each specimen, the list of orders.
Work Order management (Laboratory domain)
The OrderManager tool is able to manage work orders; that means that it can act either as an Order Filler or an Automation Manager for the LAB-4 transaction defined in the Laboratory Technical Framework. As a consequence, both parts support OML\^O21\^OML_O21, OML\^O33\^OML_O33 and OML\^O35\^OML_O35 message structures.
Test your Order Filler
As an Order Filler, you may want to send messages to our Automation Manager. To do so, retrieve the configuration of the Automation Manager part of the simulator from menu Laboratory > Automation Manager > Configuration.
If you want to see the work orders received by the Automation Manager, go to the data browser for Laboratory Automation Manager actor. The creator of the work orders contained in the messages you send is set to SendingApplication_SendingFacility.
Test your Automation Manager
There are two ways to send messages to your Automation Manager from the Order Manager tool. The first thing you have to do in both cases, is registering your system under test within the application. To do so, go to the “SUT Configurations > HL7v2 responders” section of the tool, and click on the “Create a configuration” button. To get explanation about SUT configuration read this section of the user manual.
Creating a work order from scratch
Going to Laboratory > Order Filler > [LAB-4] Notify Automation Manager of work orders, you will reach the page which allows you to configure a new work order or to cancel a work order known by the Order Filler part of the tool.
This feature works exactly in the same way as the creation of laboratory orders
Creating a work order from an existing laboratory order
In the context of a workflow, the work order is created by the Order Filler from a laboratory order previously received from an Order Placer or created within the Order Filler itself. The tool allows the user to create a work order using a laboratory order owned by the Order Filler part of the tool. The message structure used to send such a work order will be the same that the one used at receiving/sending time of the related laboratory order.
To select the laboratory order to use, go to the “Data browser” section and select one of “All orders (battery-centric)” or “All orders (specimen-centric)”. Use the  button to select the laboratory order/specimen to use. A new page will be opened, the lists of related work orders/specimens/containers are displayed. You can remove the entities which must not appear in the message using the trash icon. Do not forgot to select your system under test configuration in the drop-down list at the top of the page and click on the “Send message” button.
Analytical Work Order Step (Laboratory domain)
The OrderManager tool supports the LAW Profile of the Laboratory Domain. It means that the OrderManager tool is able to send and reveive query for AWOS (Analytical Work Order Step) (LAB-27 transaction) and to send and receive AWOS (LAB-28 transaction). Testing of transaction LAB-29 (AWOS Status Change) is described under the Laboratory Test results management section.
Test your Analyzer
As an Analyzer, you may want to send a query for AWOS to our Analyzer Manager (LAB-27) and receive AWOS from our Analyzer Manager (LAB-28).
Query for AWOS
As defined in the Laboratory Technical Framework Supplement for the Laboratory Analytical Workflow Domain (LAW), the Analyzer can query the Analyzer Manager for a WOS realated to a specimen. This is described in the LAB-27 transaction.
To do so, retrieve the configuration of the Analyzer Manager part of the simulator by going to Laboratory > Analyzer Manager > Configuration. The queries received by the tool are gathered under the Laboratory > Analyzer Manager > [LAB-27] Received AWOS Queries section. On that page, you will also be able to retrieve or generate the related AWOS or to send a Negative Query Response to your system.
AWOS Broadcast
As defined in the Laboratory Technical Framework Supplement for the Laboratory Analytical Workflow Domain (LAW), the Analyzer can receive a new AWOS or a cancelation on an existing AWOS, from the Analyzer Manager. This is described in the LAB-28 transaction.
Going to Laboratory > Analyzer Manager > [LAB-28]AWOS Broadcast, you will reach the page which enables you to configure a new AWOS or to cancel one known by the tool.
For details about the worflow to create or cancel an AWOS, read the following sections:
Test your Analyzer Manager
As an Analyzer Manager, you may want to receive a query for AWOS from our Analyzer (LAB-27) and send an AWOS to our Analyzer (LAB-28).
Query for AWOS
The Analyzer can query the Analyzer Manager for a AWOS related to a specimen. This is described in the LAB-27 transaction.
To do so, go to the Laboratory > Analyzer > [LAB-27] Query for AWOS.
First at all, select a System Under Test (SUT) configuration in the SUT configuration drop-down list.
Then, select the “Query Mode” and fill the required parameters values.
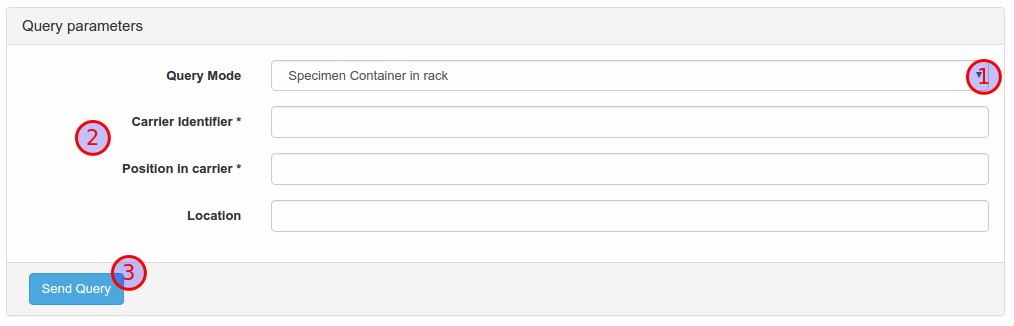
Finally, hit the “Send Query” button. The Analyzer Simulator will send the query to the SUT and the test report will be displayed.
AWOS Broadcast
The Analyzer can receive a new AWOS or a cancelation on an existing AWOS, from the Analyzer Manager. This is described in the LAB-28 transaction.
To do so, retrieve the configuration of the Analyzer part of the simulator at Laboratory > Analyzer > Configuration.
If you want to see the AWOS received by the Analyzer, go to the Data Browser. The creator of the work orders contained in the message you send is set to SendingApplication_SendingFacility.
Laboratory test results management
This page describes the Test Result Management part of the Order Manager. This part involved
- Analyzer (LAW)
- Analyzer Manager (LAW)
- Order Filler (LTW)
- Order Result Tracker (LTW)
- Automation Manager (LTW)
There are two ways of sending results to your system under test:
- You create a new order and configure results
- You use an existing order and append observations to the orders and/or specimens.
The explanations below are based on the worklow for the LAB-3 transaction (with specimen centered result reporting) but you will get the same kind of screens for the other transactions.
First select the specimen/order for which you want to send test result (hit the button in action column).
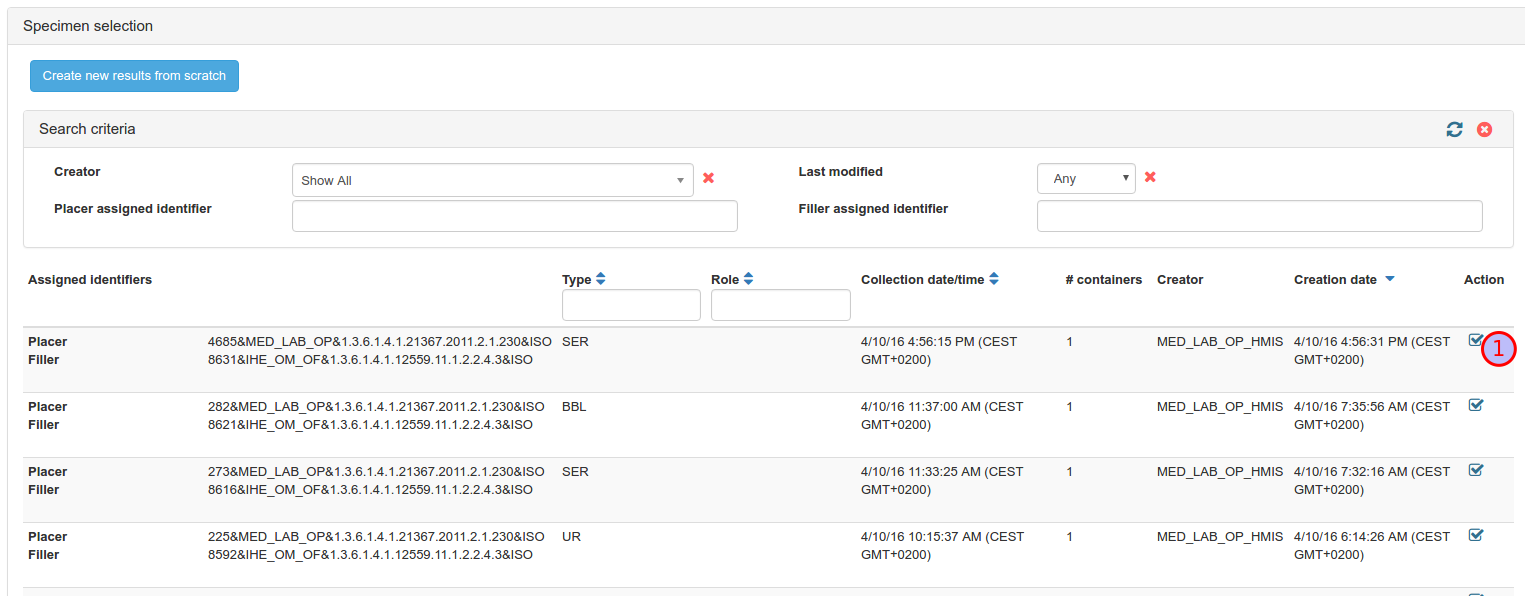
Then, you can add observations at the specimen level (2) or order level (3).
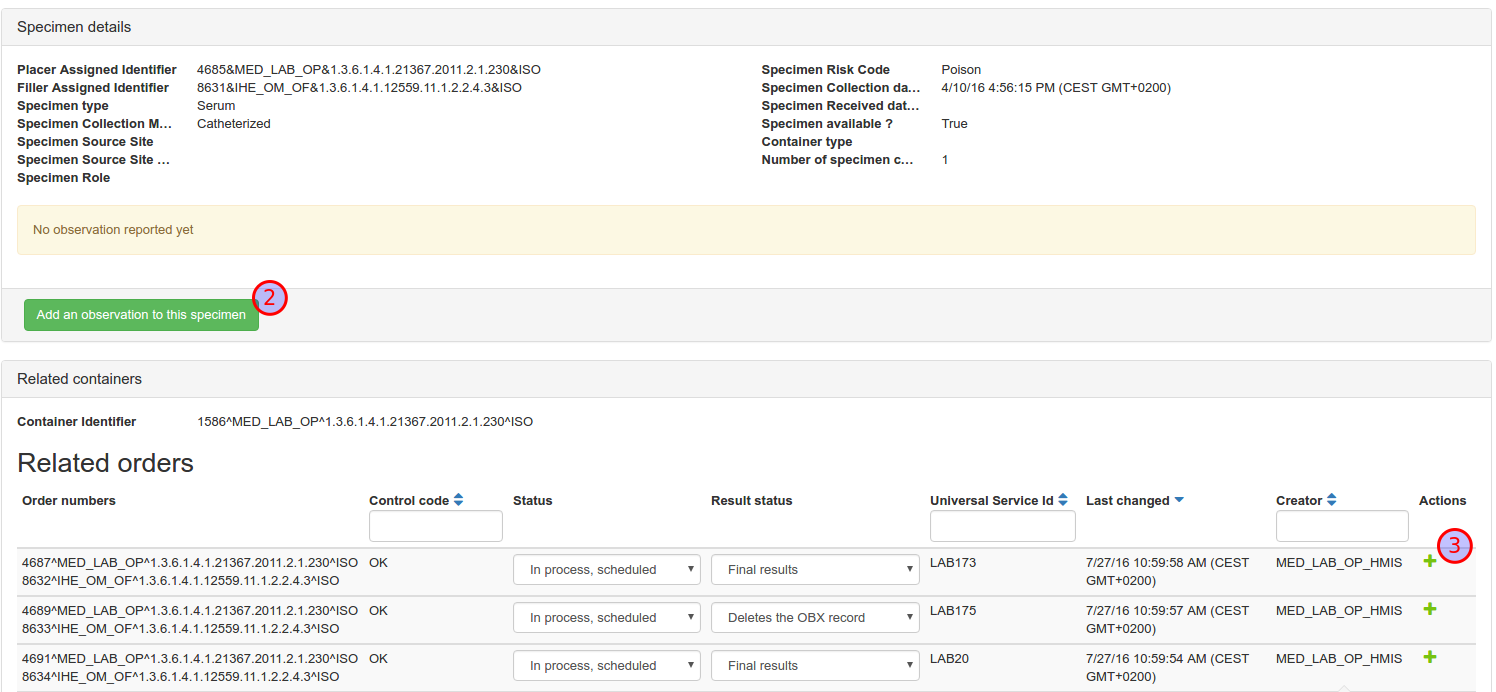
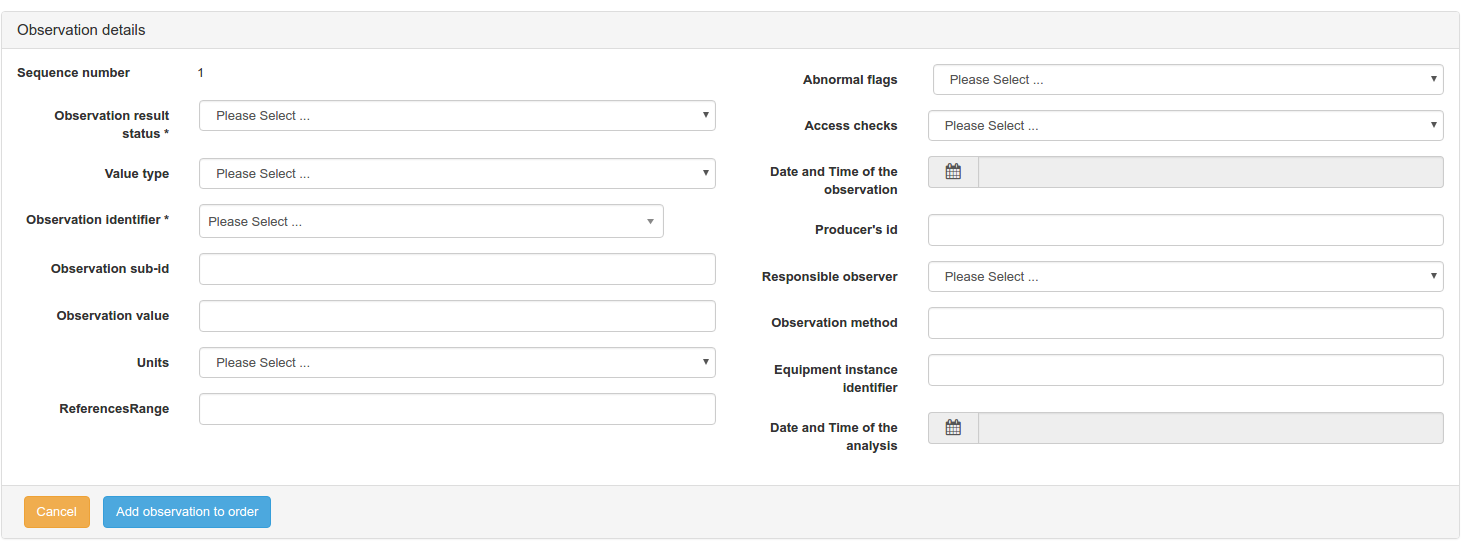
In both cases, you will reach the following screen. Populate the observation’s attribues and click on the blue button to complete the addition.
As shown below, the newly created observation will appear next to the related order or specimen

When all the observations are entered, click on the “Send message” button.
Laboratory Specimen Barcode Labeling
The Order Manager emulates the Label Broker and Label Information Provider actors of the LBL profile.
Test your Label Broker
Your system is required to support the 3 transactions defined in the profile, to test them go to the Label Information Provider sub-menu Laboratory > Label Information Provider and
- Access its configuration from Configuration for the [LAB-62] Query for Label Delivery and [LAB-63] Label and Containers Delivered transactions
- Access [LAB-61] Label Delivery Request to send messages to your system (more)
You also need to register your system as an HL7 responder (more…)
Test your Label Information Provider
Your system is required to support the 3 transactions defined in the profile, to test them go to the Label Broker sub-menu Laboratory > Label Broker and
- Access its configuration from Configuration for the [LAB-61] Label Delivery Request transaction
- Access [LAB-62] Query for Label Delivery to query your system (more) Access *[LAB-63] Label and Containers Delivered transactions to notify your system of printing completion (more)
You also need to register your system as an HL7 responder (more…)
Label Delivery Request
Send label delivery requests to your Label Broker
When you have chosen the patient and encounter for which you need the labels, fill out the form with specimen details. The random icon will take random values from the various value sets.
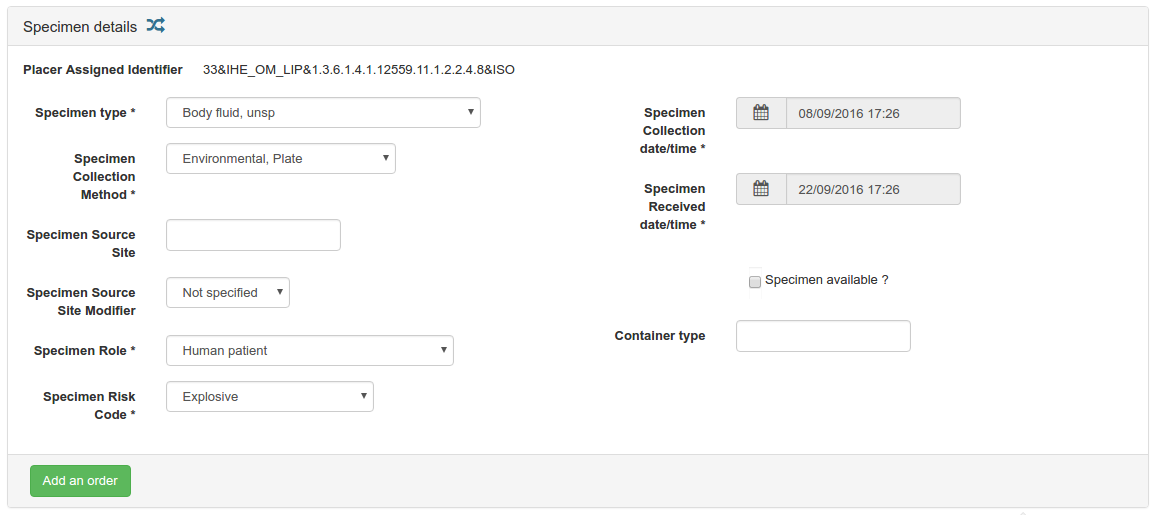
To append a first order, click on “Add an order” button. A new form is displayed to enter the details about the order.
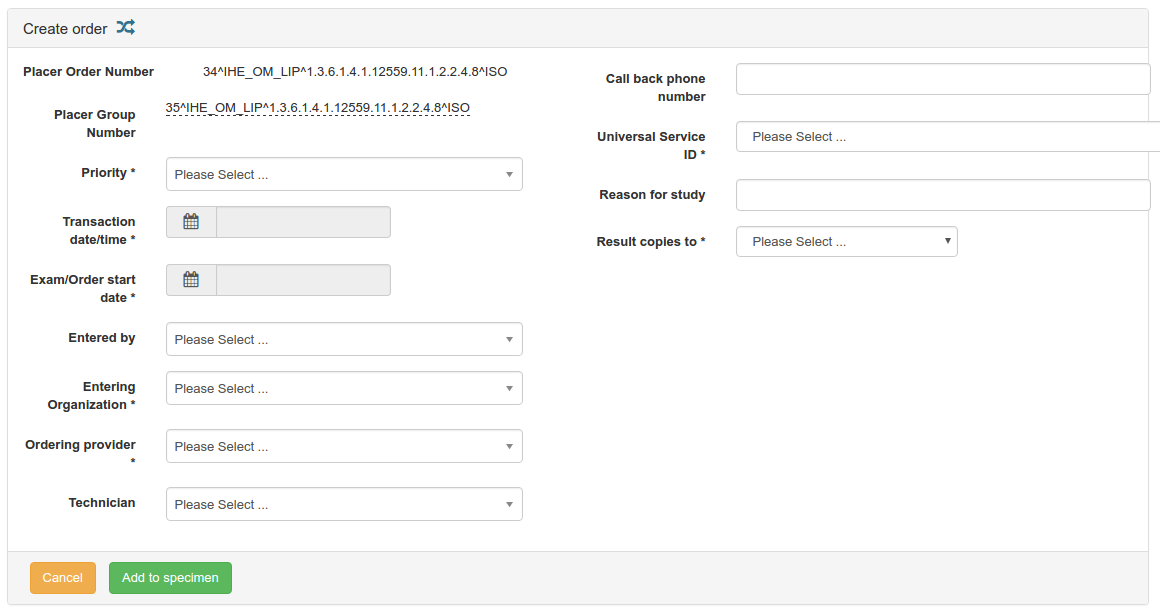
When the order’s characteristics are entered, click on “Add to specimen”. Add another order if needed. You can add as many orders as you need.
If you need a label for more than one container, click on the plus icon next to the number of needed labels.
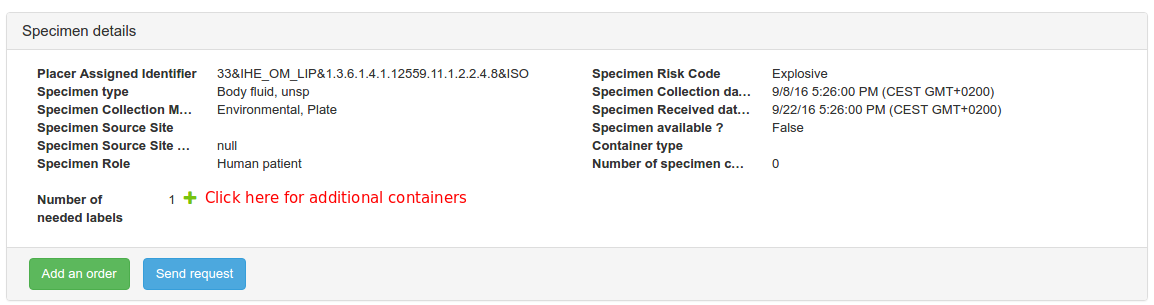
The number of needed labels increases by one and the list of additional labels is displayed below. You can edit the various attributes with the pencil icon.
When your request is ready, click on “Send request” button.
Query for Label Delivery
Query your Label Information Provider for label deliveries.
You can perform your query using various parameters.
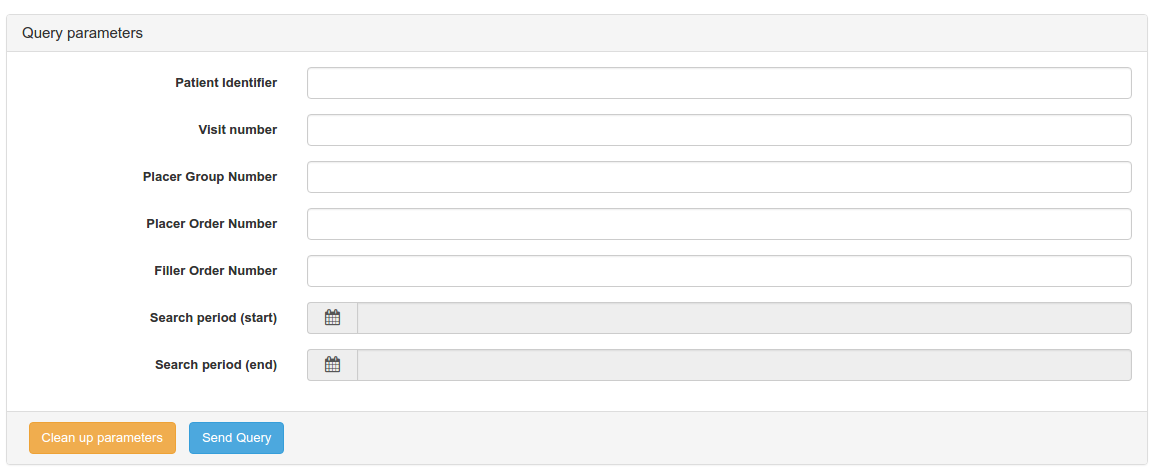
When you have fill your request, click on “Send query”.
Labels and Containers Delivered
Notify your Label Information Provider of the delivery of labels.
All the label delivery requests known by the Label Broker of the tools are gathered in the table. Only select the one to send to your system.
